Showing posts with label Blogging. Show all posts

10.24.2011

Blogger: How to Add Adsense Below Post Titles

Google Adsense is the most popular ad network on the planet. A lot of Blogger users also use it. It's an endless discussion where to place these ads on your blog for maximum exposure. The best ad places are around the header or above the posts or below the post titles. You can easily add adsense in your sidebar as a gadget. But Blogger doesn't allows us to directly place the ads below post titles. The ads below post titles have proven to be one of the most successful money making possitions. So, what are you waiting for? Follow this tutorial to add your Adsense ads below post titles.
Please Note: I'm assuming that you're using the new Adsense interface.

Steps!

  1. Log in to your Google Adsense account by going to https://www.google.com/adsense/
  2. Go to My ads tab and open Ad units from the left side by expanding Content link.[View Screenshot for Help]
  3. Click new ad unit to create a new ad.[View Screenshot for Help]
  4. Select the size, type and color of your ad. For best results chose either 300x250 medium or 336x250 large rectangle.[View Screenshot for Help]
  5. Give your ad a remember-able name and ad a custom channel to track the ad performance. If you don't know anything about channels then leave that option.
  6. After filling required information, click save and get code button at the bottom of the page.[View Screenshot for Help]
  7. A pop-up window will appear with the ad code. Copy that code.[View Screenshot for Help]
  8. Before pasting the ad code in Blogger, we must make it compatible with Blogger format. So go tohttp://www.hacktrix.com/adsense-code-converter/ paste the ad code and convert it. You'll find the converted ad code in the bottom box there. Copy the converted ad code.
  9. Open your Blogger account and go to Design then Edit HTML tab and check Expand Widget Templates option.
  10. Press Ctrl + f & find <data:post.body/> you'll see some code like this:
  11.     <div class='post-body entry-content'>
    <data:post.body/>
    <div style='clear: both;'/> <!-- clear for photos floats -->
    </div>
  12. Paste the converted ad code just before the above code. The result would look something like this:
  13. <script type="text/javascript"><!--
    google_ad_client = "ca-pub-xxxxxxxxxxxxxxx";
    /* my ads */
    google_ad_slot = "xxxxxxxxxx";
    google_ad_width = 300;
    google_ad_height = 250;
    //-->
    </script>
    <script type="text/javascript"
    src="http://pagead2.googlesyndication.com/pagead/show_ads.js">
    </script>
    <div class='post-body entry-content'>
    <data:post.body/>
    <div style='clear: both;'/> <!-- clear for photos floats -->
    </div>
  14. Click the PREVIEW button to see the result. Thought you might not see ads below post titles instantly because sometimes Adsense ads take some time to display.
  15. After that save your template by clicking the SAVE TEMPLATE button.

Tip: Make Ads Appear Only on Post Pages


Usually, users don't like to see too many ads on a single page. So, we can hide the ads under post titles on main page. These ads will appear only when users will click the post title and go to the post page. To do that follow the steps above but after step 8 you have the converted ad code. Ad some more code in that converted code so that it should look like this:

<b:if cond='data:blog.pageType == &quot;item&quot;'><script type="text/javascript"><!--
google_ad_client = "ca-pub-xxxxxxxxxxxxxxx";
/* my ads */
google_ad_slot = "xxxxxxxxxx";
google_ad_width = 300;
google_ad_height = 250;
//-->
</script>
<script type="text/javascript"
src="http://pagead2.googlesyndication.com/pagead/show_ads.js">
</script></b:if>

What I did here is that I've added an if condition to make the ads appear only on post pages. After that, follow the steps above to complete the tutorial.

9.30.2011

How To Add Drop Down Menu To Blogger

A drop down menu is a high light for any blog or website. It makes people access your blog easily and reach the contents quickly. The ease of access keeps your visitors to your blog.


Remember Always Back Up Your Template Before You Make Changes.

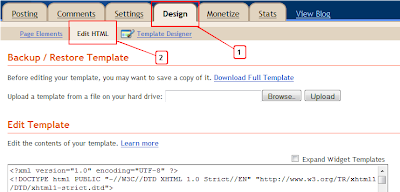
Step 1. In Your Blogger Dashboard Click Design > Edit Html 
Design Edit Html Blogger


Step 2. Find the following piece of code in your blogs Html : (Click Ctrl and F for a search bar to help find the code)


   ]]></b:skin>   


Step 3. Copy and paste the following code Directly Above / before  ]]></b:skin>


/*Start Css Menu*/
.menu{
border:none;
border:0px;
margin:0px;
padding:0px;
font-family:verdana,geneva,arial,helvetica,sans-serif;
font-size:14px;
font-weight:bold;
color:8e8e8e;
}
.menu ul{
background:url(https://blogger.googleusercontent.com/img/b/R29vZ2xl/AVvXsEiNMOpfr3RFzabyr7rvSqeymNg-4PQpviBr2VqkBFLQ2KNj0FlGoAgvgnrFatP9TrLeij39Zht8eq9lIn4ZCEhPUkfqoQ4GiNZg7ijJCy8cNSZl1sc7qZArPNMsiHjZZgu2zfBj5Q-scRdF/s1600/menu-bg.gif) top left repeat-x;
height:43px;
list-style:none;
margin:0;
padding:0;
}
.menu li{
float:left;
padding:0px 8px 0px 8px;
}
.menu li a{
color:#666666;
display:block;
font-weight:bold;
line-height:43px;
padding:0px 25px;
text-align:center;
text-decoration:none;
}
.menu li a:hover{
color:#000000;
text-decoration:none;
}
.menu li ul{
background:#e0e0e0;
border-left:2px solid #a80329;
border-right:2px solid #a80329;
border-bottom:2px solid #a80329;
display:none;
height:auto;
filter:alpha(opacity=95);
opacity:0.95;
position:absolute;
width:225px;
z-index:200;
/*top:1em;
/*left:0;*/
}
.menu li:hover ul{
display:block;
}
.menu li li {
display:block;
float:none;
padding:0px;
width:225px;
}
.menu li ul a{
display:block;
font-size:12px;
font-style:normal;
padding:0px 10px 0px 15px;
text-align:left;
}
.menu li ul a:hover{
background:#949494;
color:#000000;
opacity:1.0;
filter:alpha(opacity=100);
}
.menu p{
clear:left;

.menu #current{
background:url(https://blogger.googleusercontent.com/img/b/R29vZ2xl/AVvXsEi6LgFetK5cItMpvhl3zfQjbUYLYzFn-h3DVL8pySS-Y9sB0YUK3c7aUUT75wlhmLw86lgUdIYd1_iadKBawue_wNs1frKWfpixqbFk4Qhe2jefRAvPJUZ66Ra70DMA2rhBhWaOHhkBQcjD/s1600/current-bg.gif) top left repeat-x;
color:#ffffff;
}

/*End Css Menu from http://www.spiceupyourblog.com*/


Step 4. Save your template.

That's the Css added next is to add the html for your menu.

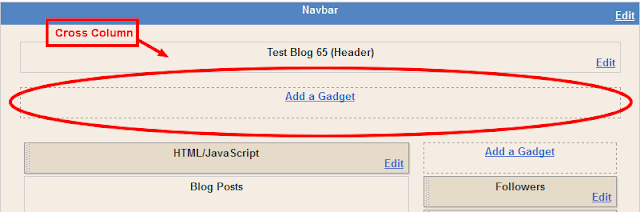
Now go to your blogs Design Page, we will be adding the menu across your blog below the header.This area is called Cross Column and can be seen in the image below.If your blog does not have this section available you can see how to enable it here - Add Full Width Cross Column Gadgets To Blogger.


Add The Menu Html


In your blogs Design Page click Add A Gadget > Choose Html/Javascript > Copy and paste the following code into the Html/Javascript gadget :

<div class="menu">

<ul>
<li><a href="#" id="current">Home</a></li>
<li><a href="#" >Products</a>
<ul>
<li><a href="#">Drop Down CSS Menus</a></li>
<li><a href="#">Horizontal CSS Menus</a></li>
<li><a href="#">Vertical CSS Menus</a></li>

<li><a href="#">Dreamweaver Menus</a></li>
</ul>
</li>
<li><a href="/faq.php">FAQ</a>
<ul>
<li><a href="#">Drop Down CSS Menus</a></li>
<li><a href="#">Horizontal CSS Menus</a></li>

<li><a href="#">Vertical CSS Menus</a></li>
<li><a href="#">Dreamweaver Menus</a></li>
</ul>
</li>
<li><a href="/contact/contact.php">Contact</a></li>
</ul>
</div>


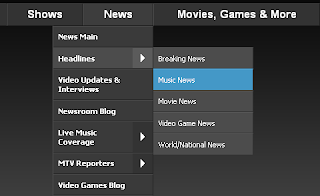
This is the code that makes up the menu in the demo above.Replace the hash tags (#) with your links and the text with your text.If you take a few minutes to reference the demo and the code you should see how it works.If you want to add more links you can do so in the same way, once again take a few minutes to look at the layout of the code and you will see how its done.

Template Designer Tabs Fix


If you use a template from the Blogger Template Designer there is a section of Css that will effect this or any menu you place in the cross column section.This is called tabs and you will need to remove or over ride the tabs css.

Google Buzz Share Button - Widget for Blogger


Google Buzz is a great social tool which is very similiar to Twitter and Facebook. It's a wonderful way to engage and interact with your readers! Make sure to implement these Google Buzz buttons into your blogger posts, so that users can easily share your content on Google Buzz.


Google Buzz It Button to Blogger


  1. Go to Layout >Edit HTML in your Blogger Dashboard.
  2. Back up your existing Template before making any changes!
  3. Make sure to check the "Expand Widget Templates" box.
  4. Here is the Google Buzz it Code:
    <div style="float:right;padding:4px;">
    <a expr:href='&quot;http://www.google.com/reader/link?url=&quot; + data:post.url + &quot;&amp;title=&quot; + data:post.title + &quot;&amp;srcTitle=&quot; + data:blog.title+ &quot;&amp;srcURL=&quot; + data:blog.homepageUrl ' rel='nofolloW' style='text-decoration:none;' target='_blank'>
    <img alt='Buzz It' src='http://i48.tinypic.com/idyc04.png' style='border:0px;'/></a>
    </div>
  5. Search for this line of code in your template:
    <div class='post-header-line-1'/>
    and place the Google Buzz it Code right after the code you searched for above.
    If this doesn't work, then search for this code below and place the Google Buzz it Code directlybefore it.
    <data:post.body/>
  6. Now save your template.


Google Buzz Button with Share Count to Blogger


  1. Here is the Google Buzz it with Share Count Code 
    <div style="float:right;padding:4px;"> <script type='text/javascript'> njuice_buzz_url = '<data:post.title/>'; njuice_buzz_title = '<data:post.url/>'; njuice_buzz_share = 'reader'; </script> <script type='text/javascript' src='http://button.njuice.com/buzz.js'/> </div>
  2. Place the Google Buzz it with Share Count Code either
    directly after this:
    <div class='post-header-line-1'/>
    OR 
    directly before this:
    <data:post.body/>
  3. To change the style of the widget add either 
    njuice_buzz_size = 'small';
    or 
    njuice_buzz_size = 'simple';
    just after 
    njuice_buzz_share = 'reader';
  4. Save your blogger template.

9.29.2011

How To Add Revolver Maps In Blog

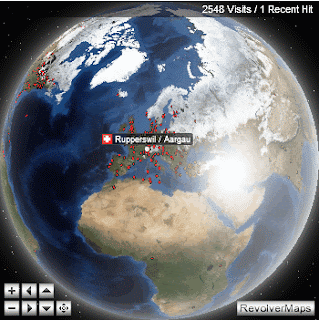
The use of Revolving Globe gadget to display the visitors of a website helps the author to analyse his page and the visitors to to identify how much the website is spread around the globe. They can decide whether to trust the content or not.


How to add a widget to a blogger.com (blogspot.com) layout?
  1. Login to your Blogger-account
  2. Under 'Manage Blogs' click on 'Design'. You get an overview of the page elements on your blog. If not click on 'Page Elements'
  3. Click on one of the 'Add a Gadget' links, a pop-up opens
  4. Under 'Basics' click on 'HTML/JavaScript'
  5. Paste the code you get at revolvermaps.com into 'Content', optionally add a title
  6. Click on 'SAVE'
  7. Drag the new page element representing the widget to a position of your choice
  8. Click on 'PREVIEW', check if the widget fits into your layout. You may have to experiment a little in order to find appropriate size-settings for the widget.
  9. Click on 'SAVE', you're done
How to add a widget to Wordpress.com 
  1. The HTML-Map as well as the HTML-Button are compatible with Wordpress.com. Create the Map here, if you want to use the Button create it here, make sure you've choosen 'HTML-Map' respectively 'HTML-Button' as the code version. Add the code to your Wordpress-Blog as follows:
    1. Login to your Wordpress account
    2. Go to 'My Blog' - 'Dashboard' - 'Appearance' - 'Widgets'
    3. Drag the Element 'Text - Arbitrary text or HTML' to the sidebar
    4. Copy the code from the RevolverMaps setup page to the big textbox, optionally add a title
    5. Click on save, you're done.

Code for the Revolver maps widget


For Larger Version Go tohttp://www.revolvermaps.com/?target=setup
(180px*180px  To 350px*350px)


For Mini version Go tohttp://www.revolvermaps.com/?target=setupmini
(70px*70px  To 178px*178px)


9.26.2011

8 Deadly Sins of Site Design

Am sharing with you people an image that explains the 8 deadly sins of site design..They are bad navigation, too many ads,bad content structure,obtrusive use of audio & video,registration requirement,boring content and design,poor legibility, and finally lack of frequency.. Click on the image and open it. The image is too big to show on this page.That's why uploaded as small..sorry guys..

9.25.2011

What is a feed?


A Feed is a mechanism for publishing your site content so that new posts can automatically be picked up by software programs. Many people use "feed reader" software to collect the latest posts from multiple sites that they enjoy reading so that they can read them all in one place and never miss an update, without needing to check each site every day or every hour. There are feed readers that can be installed on your local computer (many email programs include feed reading features), as well on online services like Google Reader
The standard icon for feeds looks like this: RSS Feed Icon
Most blogging services & platforms create feeds for you automatically. You may even have a feed and not know it, but your browser can tell you. Go to your site's main page as a user would see it (not as the administrator) and check the following:
  • if using Internet Explorer, look for the orange RSS icon in your toolbar, below the URL bar. Click on it to see the list off feeds available from your page
  • If using Firefox, Safari, or another browser, the RSS icon will likely appear in the URL bar; it may be a different color. You can click on it for a list of available feeds.
Select one of the feeds to open it in your browser. You can then copy the URL to use when claiming your blog. (Note: many services offer a comments feed; we don't want that one.)
There are two main types of feeds: Atom and RSS. We prefer Atom, but can use either one. Wikipedia, among other places, has a more in-depth explanation of feeds.
Most blog hosting services make feeds auto-discoverable and even offer you a way to specify the feed URL(s). If you are managing your own site setup, you can enable auto-discovery of your feed(s) for your site by adding a line like this to the section of your HTML code:
<link rel="alternate" type="application/rss+xml" 
  title="{enter the title of your feed or page here}" 
  href="{enter the URL for your feed here}" />
It's also a good idea to have your feed refer back to your main page. Your feed should tell what page it belongs to -- the main where someone can go in a browser to see the content listed in the feed. Each feed item has a permalink to a page for that specific item, but the feed itself should also link to your main page. That way we know it's your feed, and not somebody else's.
This can be done in various ways, depending on your feed format. In RSS, there is a <link> element inside the <channel> element but not inside any <item> elements, like:
<link>{enter the URL for your main page here}</link>
For ATOM feeds, use a link similar to the auto-discovery link on the main page. This goes at the top level of the ATOM page:
<link rel="alternate" type="text/html" 
  href="{enter the URL for your main page here}" />

9.21.2011

How to Add Cute Feedburner box to Blogger /blogspot


Follow simple and easy step to adding this feed box to blogger ---->>>>

* First go to your blogger Dashboard.

* Now click in design tab and edit HTML.

* Click in small box to expand your blogger Template.

* Now find this code </head> by CTRL+F key.

* Copy below code and paste before </head>

<style type="text/css">
.newsletter-outer  {
border : 1px solid #cecece;
padding : 3px;
margin-bottom : 10px;
}
.newsletter {
background : url(http://santabanta.mywapblog.com/files/newsletter-bg.gif) no-repeat center top;
height : 68px;
padding-top : 17px;
padding-left : 75px;
color : #fff;
}
#sidebar .newsletter a, #sidebar .newsletter a:visited {
color : #fff;
}
.newsletter form {
font-size : 14px;
}
.newsletter #subscribe_email {
vertical-align : top;
margin-right : 5px;
padding : 3px;
background : none;
width : 190px;
} 
</style>

* Now click to save your blogger template.

* Again go to your blogger Dashboard and click in design tab.

* Now you are here --->>> Page Element.

* Click in Add Gadget which is in blog sidebar.

* When open new window click in HTML/javascript from list.

* When open new blank box copy below code and paste in blank box. 

<div class="newsletter-outer">
 <div class="newsletter">
  <form action="ENTER HERE YOUR FEEDBURNER EMAIL URL" method="post" name="newsletter" id="newsletter">Enter your email address:
   <div><input type="text" name="subscribe_email" id="subscribe_email" /><input type="image" src="http://santabanta.mywapblog.com/files/go.gif" name="submit" id="sumbit" /></div>

  </form>
  <a href="ENTER HERE YOUR FEED URL/">Subscribe to RSS Feeds</a>
 </div>


NOTE:- Remove Highlighted text from above code with your own.


* Now click to save your HTML/javascript and now you are done,

9.15.2011

How to display your web site logo on the address bar (Favicon)


you can now change the usual icon of your blog or website in the address bar and can display the icon you want.This will help you look your website better and more professional. You just need to do is to make an icon of size 16X16 in the .ico format or .gif format. Here you can do it simply by uploading the picture of your icon or you can download the application from here itself.


First, you have to create a logo for your site; a very tiny logo to be specific. The size of the logo should be 16x16 pixels and it should be saved as a Windows icon file (logo.ico for example). If your image editor doesn't support saving files in Windows icon format, you can use the following online tool or download an icon editor from a shareware site.


Once you have an icon file with your logo, you're ready to take the final step. Following methods will work in Explorer 5.x and higher without having any negative effects on other browsers.
Method 1
This is the easiest method to implement and it will work regardless of the particular page on your site users choose to add to their favorites list. Don't worry if you don't have access to your web site root; take a look at the next method.
If you have access to the root of your web site, simply save your icon file as "favicon.ico" there. For example, if your web site is "www.chami.com", your icon file should be available at "www.chami.com/favicon.ico". The web browser will look for favicon.ico whenever your site is added to the favorites list and if it is found at the root of your web site, the icon will appear next to the link to your site.
Method 2
If you don't have access to the root of your web site, you have to add the following tag to your web page so that the browser will know where to look for your icon. Unlike before, this time you can save the icon under any name ending with ".ico" We'll use the name "logo.ico" and assume that your web site is under the directory "~your_directory".

<LINK REL="SHORTCUT ICON"        HREF="/~your_directory/logo.ico">
Listing #1 : HTML code. Download logo.htm (0.2 KB).
    NOTE:Above tag should be inserted in-between the <HEAD> and </HEAD>tags.

By the way, you can specify multiple logos for multiple pages using the second method. Simply save your icons using unique names, such as logo1.ico, logo2.ico, logo3.ico for example, and replace "logo.ico" in the above HTML code with the name of the icon you want to use for any particular page.


9.14.2011

The 3 Best Google Analytics Android Apps

google analytics apps for android
If you’re running a blog, Google Analytics may be the best single tool to analyse your web traffic. Available for free, and capable of providing excellent data, Analytics is a must-have.


The basic site isn’t well optimized for mobile devices however, which can be frustrating for webmasters who want to keep tabs on sites without dragging around a laptop. Thankfully, some Android developers have come to the rescue with apps specifically designed to make Analytics easy to use on a smartphone.

gAnalytics [2.2+]

google analytics apps for android
Free is always great, but sometimes it comes at the price of functionality. This is particularly true of apps that are compatible with Google Analytics. Several options (including Droid Analytics, below) are paid, and that isn’t going to be attractive to everyone.
Fortunately, the free price tag on gAnalytics doesn’t require much in the way of sacrifice from users. This app packs most of the information that you’ll need including visitors, popular keywords, referring sites, and more. Better yet, it does so with an interface which is actually more practical and professional than that of Droid Analytics.
The downside? Despite many interface advantages, switching between different timeframes when looking at site data is a pain in the butt, and Droid Analytics can provide more data at once. These are not massive flaws, however, and I suspect most users will be happy with what gAnalytics offers.

Droid Analytics [1.1+]

mobile app analytics
This rather clunky app receives isn’t hard to use, but receives no praise for its appearance. It looks and feels like a java program for a computer that’s been crammed on to a small screen, and while it’s as quick as any other app, it seems outdated.
If you can get over the appearance, however, you’ll find a wonderful app that provides a lot of Google Analytics data. What I most about this app is how easy it is to view data from different time periods. You can view the last seven days, the last 30 days, or any other time period by touching the clock icon. It’s also possible to break down data by different increments. For example, you can see the number of visitors you’ve received by day, by week, or by year.
Despite what I like about this app, and the fact I’ll probably use it instead of gAnalytics in the future, I think the current price of $3.47 is steep considering the lack of attention to detail. The developer really should slap a new coat of paint on it.
There is one advantage to be old and crusty, however – this app will work on Android versions as old as 1.1.

Simple Analytics Widget [2.1+]

google analytics apps for android
Both of the above apps are suitable for most users, but they are missing one important feature. A widget. I mean, come on. Every Android app needs a widget!
Thankfully there are some available, and among them, I prefer Simple Analytics Widget. The reasons are quite simple. First, the widget is the best looking of the bunch, presenting information in simple but attractive bold font. Second, the widget can present several different types of data (such as visits a day, page views per day, or bounce rate).
To add icing to this tasty widget cake, you’ll find the widget is easy to use, as it connects straight to your selected Google account rather than asking for a specific username/password combination.

9.09.2011

Blog on Blogger using iPhone app


If you blog on Blogger and wish you could post using your iPhone, Google has some good news for you.

On Thursday, Google released the official Blogger app for the iPhone and iPod touch. The app is a modest first effort that'll let you post to your blog, upload photos, tag a post, add labels and more. The app is available for free from the App Store. [iTunes via Google]

8.19.2011

Blogumus: a flash animated 3D label cloud for Blogger


"Blogumus" is an Flash based tag cloud widget in which labels are displayed rotating in 3D.


How it works

 This widget uses a combination of JavaScript and Flash animation to parse and display your blog labels. Once installed in your template, it should work "out of the box" without any additional tweaking required, though of course you may prefer to change the variables for color, background and size if appropriate :) You should also be able to move the Label Cloud widget through the Page Elements page of your dashboard if you prefer display in a different layout location. To see Blogumus in action, both Flash and Javascript must be installed and enabled for your internet browser. However, it does degrade relatively gracefully, and label links will still be clickable (though not animated) for those who do not use JavaScript of Flash (including search engine spiders).

How to install Blogumus in your Blogger layout

Installing Blogumus in your Blogger layout is surprisingly simple! You should only need to copy and paste a section of code to your Blogger template, though any tweaks for the style of display will require some manual editing. Here are the steps required to install Blogumus in your Blogger layout: Go to Layout>Edit HTML in your Blogger dashboard, and search for the following line (or similar):
<b:section class='sidebar' id='sidebar' preferred='yes'>
Immediatly after this line, paste the following section of code:
<b:widget id='Label99' locked='false' title='Labels' type='Label'>
<b:includable id='main'>
<b:if cond='data:title'>
<h2><data:title/></h2>
</b:if>
<div class='widget-content'>
<script src='http://sites.google.com/site/bloggerustemplatus/code/swfobject.js' type='text/javascript'/>
<div id='flashcontent'>Blogumulus by <a href='http://www.roytanck.com/'>Roy Tanck</a> and <a href='http://www.bloggerbuster.com'>Amanda Fazani</a></div>
<script type='text/javascript'>
var so = new SWFObject(&quot;http://sites.google.com/site/bloggerustemplatus/code/tagcloud.swf&quot;, &quot;tagcloud&quot;, &quot;240&quot;, &quot;300&quot;, &quot;7&quot;, &quot;#ffffff&quot;);
// uncomment next line to enable transparency
//so.addParam(&quot;wmode&quot;, &quot;transparent&quot;);
so.addVariable(&quot;tcolor&quot;, &quot;0x333333&quot;);
so.addVariable(&quot;mode&quot;, &quot;tags&quot;);
so.addVariable(&quot;distr&quot;, &quot;true&quot;);
so.addVariable(&quot;tspeed&quot;, &quot;100&quot;);
so.addVariable(&quot;tagcloud&quot;, &quot;<tags><b:loop values='data:labels' var='label'><a expr:href='data:label.url' style='12'><data:label.name/></a></b:loop></tags>&quot;);
so.addParam(&quot;allowScriptAccess&quot;, &quot;always&quot;);
so.write(&quot;flashcontent&quot;);
</script>
<b:include name='quickedit'/>
</div>
</b:includable>
</b:widget>
Then preview your template. If installed correctly, you should see the tag cloud appear in your sidebar. Then you are free to save your template, edit the colors and dimensions as required, or move it to a different location. That's all!

Customizing Blogumus

In this default installation, Blogumus includes the following preset variables:
  • Width is set to 240px
  • Height is set to 300px;
  • Background color is white
  • Test color is grey
  • Font size is "12"
If you would prefer to make your widget wider, shorter, change the color scheme, etc, you will need to do this by editing various parts of the code. I'll go through these options in the order they appear in the widget code. Editing width and height The variables for width and height are found in this line of the script:

var so = new SWFObject("http://sites.google.com/site/bloggerustemplatus/code/tagcloud.swf", "tagcloud", "240", "300", "7", "#ffffff");

The width (currently 240) is highlighted in red, while the height (300px default) is highlighted in blue. These numerical values specify the width and height in pixels, so you can alter these of you prefer. Editing background color You can change the background color from white to any other color by altering the hex value in the same line:

var so = new SWFObject("http://sites.google.com/site/bloggerustemplatus/code/tagcloud.swf", "tagcloud", "240", "300", "7", "#ffffff");

For example, if you prefer a bright red background, you may replace #ffffff with #ff0000. Take a look at this page for a list of commonly used hex color codes. Alter the color of text By default, the text is set to display as dark grey ( hex value #333333). You can alter this variable in the following line:

so.addVariable("tcolor", "0x333333");

Be aware that "tcolor" is a Flash variable and doesn't include the usual hash symbol of hex color codes. Be sure to only replace the numbers! Adjust the font size The maximum font size of tags is specified in this line:
so.addVariable("tagcloud", "<tags><b:loop values='data:labels' var='label'><a expr:href='data:label.url' style='12'><data:label.name/></a></b:loop></tags>");
You can alter this to ensure tags are displayed in a bigger or smaller font if you prefer by changing "12" to a larger or smaller number. While making any of these changes, you should be able to preview your widget and be certain that your new choice of color, dimensions and background are suitable for your needs.

Related Posts Plugin for WordPress, Blogger...