Showing posts with label Tricks. Show all posts

9.30.2011

How To Add Drop Down Menu To Blogger

A drop down menu is a high light for any blog or website. It makes people access your blog easily and reach the contents quickly. The ease of access keeps your visitors to your blog.


Remember Always Back Up Your Template Before You Make Changes.

Step 1. In Your Blogger Dashboard Click Design > Edit Html 
Design Edit Html Blogger


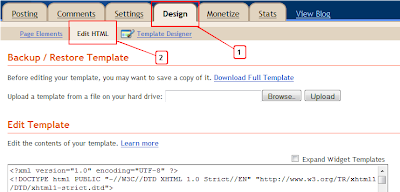
Step 2. Find the following piece of code in your blogs Html : (Click Ctrl and F for a search bar to help find the code)


   ]]></b:skin>   


Step 3. Copy and paste the following code Directly Above / before  ]]></b:skin>


/*Start Css Menu*/
.menu{
border:none;
border:0px;
margin:0px;
padding:0px;
font-family:verdana,geneva,arial,helvetica,sans-serif;
font-size:14px;
font-weight:bold;
color:8e8e8e;
}
.menu ul{
background:url(https://blogger.googleusercontent.com/img/b/R29vZ2xl/AVvXsEiNMOpfr3RFzabyr7rvSqeymNg-4PQpviBr2VqkBFLQ2KNj0FlGoAgvgnrFatP9TrLeij39Zht8eq9lIn4ZCEhPUkfqoQ4GiNZg7ijJCy8cNSZl1sc7qZArPNMsiHjZZgu2zfBj5Q-scRdF/s1600/menu-bg.gif) top left repeat-x;
height:43px;
list-style:none;
margin:0;
padding:0;
}
.menu li{
float:left;
padding:0px 8px 0px 8px;
}
.menu li a{
color:#666666;
display:block;
font-weight:bold;
line-height:43px;
padding:0px 25px;
text-align:center;
text-decoration:none;
}
.menu li a:hover{
color:#000000;
text-decoration:none;
}
.menu li ul{
background:#e0e0e0;
border-left:2px solid #a80329;
border-right:2px solid #a80329;
border-bottom:2px solid #a80329;
display:none;
height:auto;
filter:alpha(opacity=95);
opacity:0.95;
position:absolute;
width:225px;
z-index:200;
/*top:1em;
/*left:0;*/
}
.menu li:hover ul{
display:block;
}
.menu li li {
display:block;
float:none;
padding:0px;
width:225px;
}
.menu li ul a{
display:block;
font-size:12px;
font-style:normal;
padding:0px 10px 0px 15px;
text-align:left;
}
.menu li ul a:hover{
background:#949494;
color:#000000;
opacity:1.0;
filter:alpha(opacity=100);
}
.menu p{
clear:left;

.menu #current{
background:url(https://blogger.googleusercontent.com/img/b/R29vZ2xl/AVvXsEi6LgFetK5cItMpvhl3zfQjbUYLYzFn-h3DVL8pySS-Y9sB0YUK3c7aUUT75wlhmLw86lgUdIYd1_iadKBawue_wNs1frKWfpixqbFk4Qhe2jefRAvPJUZ66Ra70DMA2rhBhWaOHhkBQcjD/s1600/current-bg.gif) top left repeat-x;
color:#ffffff;
}

/*End Css Menu from http://www.spiceupyourblog.com*/


Step 4. Save your template.

That's the Css added next is to add the html for your menu.

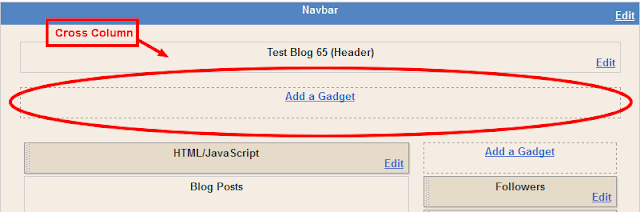
Now go to your blogs Design Page, we will be adding the menu across your blog below the header.This area is called Cross Column and can be seen in the image below.If your blog does not have this section available you can see how to enable it here - Add Full Width Cross Column Gadgets To Blogger.


Add The Menu Html


In your blogs Design Page click Add A Gadget > Choose Html/Javascript > Copy and paste the following code into the Html/Javascript gadget :

<div class="menu">

<ul>
<li><a href="#" id="current">Home</a></li>
<li><a href="#" >Products</a>
<ul>
<li><a href="#">Drop Down CSS Menus</a></li>
<li><a href="#">Horizontal CSS Menus</a></li>
<li><a href="#">Vertical CSS Menus</a></li>

<li><a href="#">Dreamweaver Menus</a></li>
</ul>
</li>
<li><a href="/faq.php">FAQ</a>
<ul>
<li><a href="#">Drop Down CSS Menus</a></li>
<li><a href="#">Horizontal CSS Menus</a></li>

<li><a href="#">Vertical CSS Menus</a></li>
<li><a href="#">Dreamweaver Menus</a></li>
</ul>
</li>
<li><a href="/contact/contact.php">Contact</a></li>
</ul>
</div>


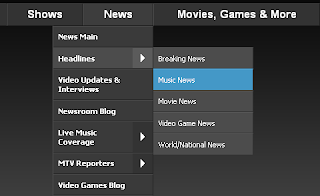
This is the code that makes up the menu in the demo above.Replace the hash tags (#) with your links and the text with your text.If you take a few minutes to reference the demo and the code you should see how it works.If you want to add more links you can do so in the same way, once again take a few minutes to look at the layout of the code and you will see how its done.

Template Designer Tabs Fix


If you use a template from the Blogger Template Designer there is a section of Css that will effect this or any menu you place in the cross column section.This is called tabs and you will need to remove or over ride the tabs css.

Google Buzz Share Button - Widget for Blogger


Google Buzz is a great social tool which is very similiar to Twitter and Facebook. It's a wonderful way to engage and interact with your readers! Make sure to implement these Google Buzz buttons into your blogger posts, so that users can easily share your content on Google Buzz.


Google Buzz It Button to Blogger


  1. Go to Layout >Edit HTML in your Blogger Dashboard.
  2. Back up your existing Template before making any changes!
  3. Make sure to check the "Expand Widget Templates" box.
  4. Here is the Google Buzz it Code:
    <div style="float:right;padding:4px;">
    <a expr:href='&quot;http://www.google.com/reader/link?url=&quot; + data:post.url + &quot;&amp;title=&quot; + data:post.title + &quot;&amp;srcTitle=&quot; + data:blog.title+ &quot;&amp;srcURL=&quot; + data:blog.homepageUrl ' rel='nofolloW' style='text-decoration:none;' target='_blank'>
    <img alt='Buzz It' src='http://i48.tinypic.com/idyc04.png' style='border:0px;'/></a>
    </div>
  5. Search for this line of code in your template:
    <div class='post-header-line-1'/>
    and place the Google Buzz it Code right after the code you searched for above.
    If this doesn't work, then search for this code below and place the Google Buzz it Code directlybefore it.
    <data:post.body/>
  6. Now save your template.


Google Buzz Button with Share Count to Blogger


  1. Here is the Google Buzz it with Share Count Code 
    <div style="float:right;padding:4px;"> <script type='text/javascript'> njuice_buzz_url = '<data:post.title/>'; njuice_buzz_title = '<data:post.url/>'; njuice_buzz_share = 'reader'; </script> <script type='text/javascript' src='http://button.njuice.com/buzz.js'/> </div>
  2. Place the Google Buzz it with Share Count Code either
    directly after this:
    <div class='post-header-line-1'/>
    OR 
    directly before this:
    <data:post.body/>
  3. To change the style of the widget add either 
    njuice_buzz_size = 'small';
    or 
    njuice_buzz_size = 'simple';
    just after 
    njuice_buzz_share = 'reader';
  4. Save your blogger template.

9.26.2011

8 Deadly Sins of Site Design

Am sharing with you people an image that explains the 8 deadly sins of site design..They are bad navigation, too many ads,bad content structure,obtrusive use of audio & video,registration requirement,boring content and design,poor legibility, and finally lack of frequency.. Click on the image and open it. The image is too big to show on this page.That's why uploaded as small..sorry guys..

How to Login To Multiple Google Accounts

There are many reasons to have multiple Google accounts. You may have multiple websites for personal and business accounts. Whatever the reason, it is inconvenient to have several browsers running or keep logging out of one to check another account.


Aside from forwarding your email to a single Gmail account, you can use browser extensions or manage the settings in Gmail to allow multiple account access without the inconveniences you are currently experiencing.
The following methods are mostly meant for accessing several Google accounts for email. Some of the other apps accessed when you are logged into your Google Account may not work.

Quick Login for Google Accounts

For this first fix, you will need to use Google Chrome (browser). The Quick Login for Google Accounts extension will allow you to access several different Google Accounts. This is ideal because you can have a browser window open and have a tab for each Google account.

Setup

1. After adding the extension to Chrome, click the new icon in the top right corner of the browser window, then on options.


2. In the name column, enter something to help you differentiate the account from the others. I chose personal, maketecheasier and untetheredoffice as the names for mine.


3. In the next box over, you will need to put your login user name. You do not need the @gmail.com or @yourgoogleappname


4. Add your login password in the next box to the right.
5. If you are using Google Apps for a business, you will need to tell the extension where the login page is. To do this, you need to click show advanced options. Another row will appear. In this row, you can paste or type the page you visit to log into your business email.


6. After all the information is entered and saved, you can try it out. Click on the Quick login icon again and choose an account to log into.

Multiple Account Sign in

Another option to enable the multiple account login option in your Google Account settings. This way will not tie you to a single browser or even computer. Remember, you will need to sign out of these accounts as well. So if you are one of those people who ticks the remember me or keep me logged in buttons, make sure you actually  log out. If you don’t,  you will have a lot of email accounts accessible to anyone else using that computer.

Setup

The setup is pretty easy for this one. Sign into your Gmail or Google Docs or some other Google application. In the top right you will see your name. Click on it to show a drop down.
1. In this drop down, there will be an option to access your Account settings.


2. Once in the settings, you will see the option to edit the Multiple sign-in.


3. You will need to log into each Google Account you’d like to access and enable this option.

4. When you have all of the accounts enabled, you can sign into multiple accounts by clicking on your name in the top right again then switch accounts.

5. you will see an option to sign into another account.


You should have access to a good number of the Google application for the other accounts you are accessing.

9.21.2011

Windows 7 Keyboard Shortcuts


Let's kick off with keyboard shortcuts – the first thing every power user must memorize with working with a new operating system. In Windows 7, we’ve uncovered several new sets of essential time-saving shortcuts that will make your mouse jealous with neglect.

Alt + P

In Windows Explorer, activate an additional file preview pane to the right side of the window with this new shortcut. This panel is great for previewing images in your photos directory.

Windows + + (plus key)
Windows + - (minus key)
Pressing the Windows and plus or minus keys activates the Magnifier, which lets you zoom in on the entire desktop or open a rectangular magnifying lens to zoom in and out of parts of your screen. You can customize the Magnifier options to follow your mouse pointer or keyboard cursor. Keep in mind that so far, the Magnifier only works when Aero desktop is enabled.

Windows + Up 
Windows + Down
If a window is not maximized, pressing Windows + Up will fill it to your screen. Windows + Down will minimize that active window. Unfortunately, pressing Windows + Up again while a window is minimized won’t return it to its former state.

Windows + Shift + Up
Similar to the shortcut above, hitting these three keys while a window is active will stretch it vertically to the maximum desktop height. The width of the window will however stay the same. Pressing Windows + Down will restore it to its previous size.

Windows + Left
Windows + Right
One of the new features of Windows 7 is the ability to automatically make a window fill up half of your screen by dragging to the left or right. This pair of shortcuts performs the same function without your mouse. Once a window is fixed to one side of the screen, you can repeat the shortcut to flip it to the other side. This is useful if you’re extending a desktop across multiple monitors, which prevents you from executing this trick with a mouse.

Windows + Home
This shortcut performs a similar function to hovering over a window’s peek menu thumbnail in the Taskbar. The active window will stay on your desktop while every other open application is minimized. Pressing this shortcut again will restore all the other windows.

Windows + E
Automatically opens up a new Explorer window to show your Libraries folder.

Windows + P
Manage your multiple-monitor more efficiently with this handy shortcut. Windows + P opens up a small overlay that lets you configure a second display or projector. You can switch from a single monitor to dual-display in either mirror or extend desktop mode.

Windows + Shift + Left 
Windows + Shift + Right
If you are using two or more displays (and who isn’t, these days?), memorize this shortcut to easily move a window from one screen to the other. The window retains its size and relative position on the new screen, which his useful when working with multiple documents. Utilize that real estate!

Windows + [Number]
Programs (and new instances) pinned to your Taskbar can be launched by hitting Windows and the number corresponding to its placement on the Taskbar. Windows + 1, for example, launches the first application, while Windows + 4 will launch the fourth. We realize that this is actually one key-press more than just clicking the icon with your mouse, but it saves your hand the trouble of leaving the comfort of the keyboard.

Windows + T
Like Alt + Tab (still our all time favorite Windows specific shortcut), Windows + T cycles through your open programs via the Taskbar’s peek menu.

Windows + Space
This combo performs the same function as moving your mouse to the bottom right of the Taskbar. It makes every active window transparent so you can view your desktop. The windows only remain transparent as long as you’re holding down the Windows key.

Ctrl + Shift + Click
Hold down Ctrl and Shift while launching an application from the Taskbar or start menu to launch it with full administrative rights.

Ctrl + Click
Hold down Ctrl while repeatedly clicking a program icon in the Taskbar will toggle between the instances of that application, like multiple Firefox windows (though not browser tabs).

9.20.2011

How to play SWF’s locally on the PlayBook?


Playing SWFs Locally or after Downloading Them to your PlayBook (including adding an icon!)
Difficulty:  Pretty easy
Step 1 – Install a Local Web Browser from the App Store.  In this case, Offline Viewer.
Note:  This will let you browse only your root /media/downloads folder for viewing, however you can link to any subfolder
Step 2 – Download a wack of SWF files.  Need a torrent?
http://thepiratebay.org/search/flash%20games < – Grab ‘very addicting flash games’ torrent
Step 3 – Place them into a subfolder (i.e. downloads/flash_games/)
Step 4 – Add a root index.html under (downloads/) with hyperlinks to the files
Step 5 – Use the Viewer to open the file into your browser
Step 6 – Create a bookmark in your browser, save it to your Home (all)
Step 7 – Hold the icon a few seconds in the All tab and move it to the Games tab
Done!
Tip:  Want to know how to create a list fast and easy?  Use your old dos / batch file tools.
Easily converting a list of files to an HTML file for linking:
Lets assume you want to have:
index.html
folder\1.swf
folder\2.swf
In the same folder as the index.html, create a BAT with the following command:
dir *.swf /a/s/b > list.txt
Run the bat in the root (not as administrator), and a print out of all the files appears named list.txt.
Now, you can use Notepad to open the file and replace the string (i.e. “C:\Documents and Settings\%username%\Desktop\” to an empty string “”).  This is because, once you move your files over, they will have a different path!  It is always better (in these cases) to use a flexible location like: \folder\1.swf for a link location.
Now, in Excel, copy/paste that list into Column B.  You should have a long list in the \folder\1.swf format.
In Column A add:  <a href=”
In Column C add: “> Click to play: </a>
In Column D add: “=B1″
In Column E add: “=A1 & B1 & C1 & D1 & E1
Copy paste Column A from the start row to the bottom row.
Copy paste Columns C to E from the start row to the bottom row.
Done!  Copy paste your entire Column E to another Notepad file – and it should look exactly like your HTML code.
Add to the top: 
<html>
<head>
<title>Your Title</title>
</head>
</body background="optional_image.jpg">
Add to the bottom:
</body>
</html>
And your done! Could be done easier? Sure, but this only takes a few minutes.  And now you have a little website with a few hundred SWF files on it.
Also, there is a reason I hard-link the SWF instead of embed.  Check it out on your Playbook, but it maximizes the heck out of the SWF file for your PlayBook.

9.18.2011

Display AdSense ads in WordPress posts

You might be experimenting with AdSense ads on your blog to achieve the best placement, you may also looking to display AdSense in your blog posts.  I’m not talking about wrapping ads around the post body. Lets say, you want to display an AdSense ad unit after every two paragraphs in your post body which you may have seen on many websites also. If not, you may take Hubpages hubs as an example. If you are looking to do so with your WordPress blog, it is possible with plugins as well as without using plugins.


Note: Below given method involves manual editing of your WordPress theme files. Make sure to back up your theme before proceeding.
  1. First, open your theme directory and edit single.php file.
  2. Search for <?php the_content(); ?> (Ctrl + F and search the string) and replace it with the below given code:
    <?php
    $block = 3; // this indicate that ad will appear after the 3rd paragraph
    $content = apply_filters('the_content', get_the_content());
    $content = explode("</p>", $content);
    for($i = 0; $i < count($content); $i++ ) {
    if ($i == $block) { ?>
    <div style="margin: 10px 0;">PUT YOUR ADSENSE CODE HERE</div>
    <?php }
    echo $content[$i] . "</p>";
    } ?>
    Change $block value according to your requirement. Replace “PUT YOUR ADSENSE CODE HERE” with your AdSense ad unit code.
  3. Save changes. Done! You may also tweak it to adjust according to your blog layout with CSS positioning.
If you are not good at coding, you may use Ad Injection WordPress plugin for the same, which is very easy to use and provides a variety of options to control ads on your WordPress blog.

9.14.2011

How Can I Get an iTunes-Like Experience for My Android Phone?


While using iTunes with an iOS device is certainly an easy and straightforward way to managing your device, one of the strengths of using an Android device is that you're not dependent on one company to give you that all-in-one solution. Several developers have their own mobile and desktop companion apps to help you manage your Android phone. While there's no exact feature-for-feature duplicate of iTunes for Android, there are plenty of apps that get you most of the way there. Here are a few of them.
How Can I Get an iTunes-Like Experience for My Android Phone?

DoubleTwist

DoubleTwist is probably the closest application to a true "iTunes for Android." The desktop app and mobile app make a great pair that gives you control over your playlists, music, and media. The app is free and available for Windows and Mac, and gives you a single app to use to manage the music you sync to your device, playlists you've created, podcasts you've downloaded, photos and videos you have on your Android phone, and even the apps you have installed. You can also use DoubleTwisty on your desktop as a jukebox app, just like iTunes if you're looking for an app that will manage your media on your computer and your phone.
The beauty of DoubleTwist is that it supports every Android device and works on virtually any computer. The mobile app gives you a robust media player and media management app that you can use to listen to music and podcasts, watch video, and more on the go. The mobile and the desktop apps don't need each other—you can use one without the other-but they work best together. With the $4.99 AirSync add-on, you can sync your media wirelessly with your desktop without having to physically connect your Android phone to it first.

Winamp

Even though it's Windows-only, Winamp has come a long way from the days when it was pretty much the only viable media player for Windows. Winamp's development team behind it has embraced Android in a big way. While the Winamp desktop app will be familiar to anyone who's used it in the past 5 years, combine it with Winamp for Android, and you have an easy and painless way to sync your music and playlists with your Android device, even wirelessly. Wireless syncing for Android is free with Winamp, and while it can be bumpy to set up, when it works, it works really well.
Like DoubleTwist, Winamp for Android doesn't need the desktop app to be a good media player. The app can live on your Android phone and serve as a music player without much help, but to unlock its real potential, you'll want WInamp installed on your desktop as well. Then, once the mobile app is set up to sync with its desktop companion, your playlists, music, podcasts, favorite ShoutCast stations, and other media will move seamlessly between your Android device and your Windows desktop. Winamp for Android even supports iTunes syncing, so your old iTunes library can easily be moved to your Android device. Winamp for Android doesn't support app syncing, but that's about the only feature it's missing.
How Can I Get an iTunes-Like Experience for My Android Phone?

Just Use iTunes

Depending on how you feel about iTunes, this can either be a relief or blasphemy. If you have a Mac and have no desire to stop using iTunes, you don't have to just because you have an Android phone. If you use a Windows PC and prefer iTunes (although we can't imagine why) you can still use it with your Android device.
Thanks to iSyncr, you can sync your music, podcasts, and playlists (including smart playlists) between iTunes and your Android phone. The app retains play counts and ratings, and works in both directions: as in music you download on your phone or buy on your computer will be copied to the device that doesn't have it. This way, if you're already familiar with iTunes and use it for your iPod Touch or iOS device, you don't need to download another app to get the same functionality for your Android device.
How Can I Get an iTunes-Like Experience for My Android Phone?

Use Another App Entirely

All in all, there is no single "iTunes for Android" app, although DoubleTwist and Winamp are probably the two that come the closest. They each have their own drawbacks and limitations, and neither is quite as seamless as the pairing of an iOS device and iTunes is. Still, they'll both give you a similar experience to what you're used to with your iPod Touch and iTunes. If you're willing to give up on that experience entirely, you can look at media players like MediaMonkey andSongbird, which will mount your Android phone as a USB device in their own interfaces and copy music and media to your device for you. Photo by 24Oranges.nl.
Sure, you don't get the same experience of managing playlists, play-counts and ratings, or anything else, but one of the nice things about Android devices is that you can just connect most of them to a computer via USB and mount them like a drive. This gives almost any app access to the files on your SD card while they're connected. Most desktop music players support syncing to USB devices, so if you're not wedded to the iTunes-like experience, there are plenty of other apps to try and experiment with.

We hope this helps! There really is no reason to carry around an iPod Touch and your Android phone if all you're doing with the iPod Touch is listening to music – there's nothing that the iPod Touch can do in that department that your Android phone can't do as well. Give one of these apps a try and see how it works for you. Unlike iOS and iTunes, if you don't like the one you've tried, you can always try a different one, no strings attached.

Related Posts Plugin for WordPress, Blogger...