Showing posts with label Android. Show all posts

1.12.2017

Google Pixel Apps Installer - Papps

Papps

What is it?

An open source installer for the Google Pixel specific apps and files.Enjoy the Google Pixel experience on any Android device with Papps.

IMPORTANT - Device should have a chipset with an ARM64 architecture - only 64-bit processor devices.

Installation instructions
1. Reboot your device into TWRP recovery
2. Flash Papps-XXX.zip
3. Wipe Cache/Dalvik
4. Reboot

5. Navigate to Settings and give permissions to Dialer (or IncallUI won't work!)

Step 5 is really important as InCallUI won't work unless permissions are enabled.

ZIP file download link  - https://www.androidfilehost.com/?w=files&flid=126245

Apps that is going to be installed: Calendar, Camera, Clock, Contacts, Dialer, Keyboard, Launcher, Messaging, Photos, Velvet, Wallpaper,Picker, Pixel Audio,(notifications, alarms, ringtones, UI).

Latest stable version is  1.0

XDA Discussion thread link

4.12.2016

Solution -Touch Screen Issue in Android ROMs

First and foremost point to note is that this method requires root.

It can be done in 3 steps

  1. Find  build.prop using root explorer.
  2. Add the following lines to the file
  3. Save it and reboot.

# Touch screen calibration
debug.performance.tuning=1
windowsmgr.max_events_per_sec=200
view.touch_slop=2
view.scroll_friction=1.5
view.minimum_fling_velocity=25
ro.max.fling_velocity=12000
ro.min.fling_velocity=8000
ro.min_pointer_dur=8
touch.size.calibration=geometric
touch.size.scale=100
#touch.size.bias=70
touch.pressure.calibration=amplitude
touch.pressure.scale=0.3

11.15.2013

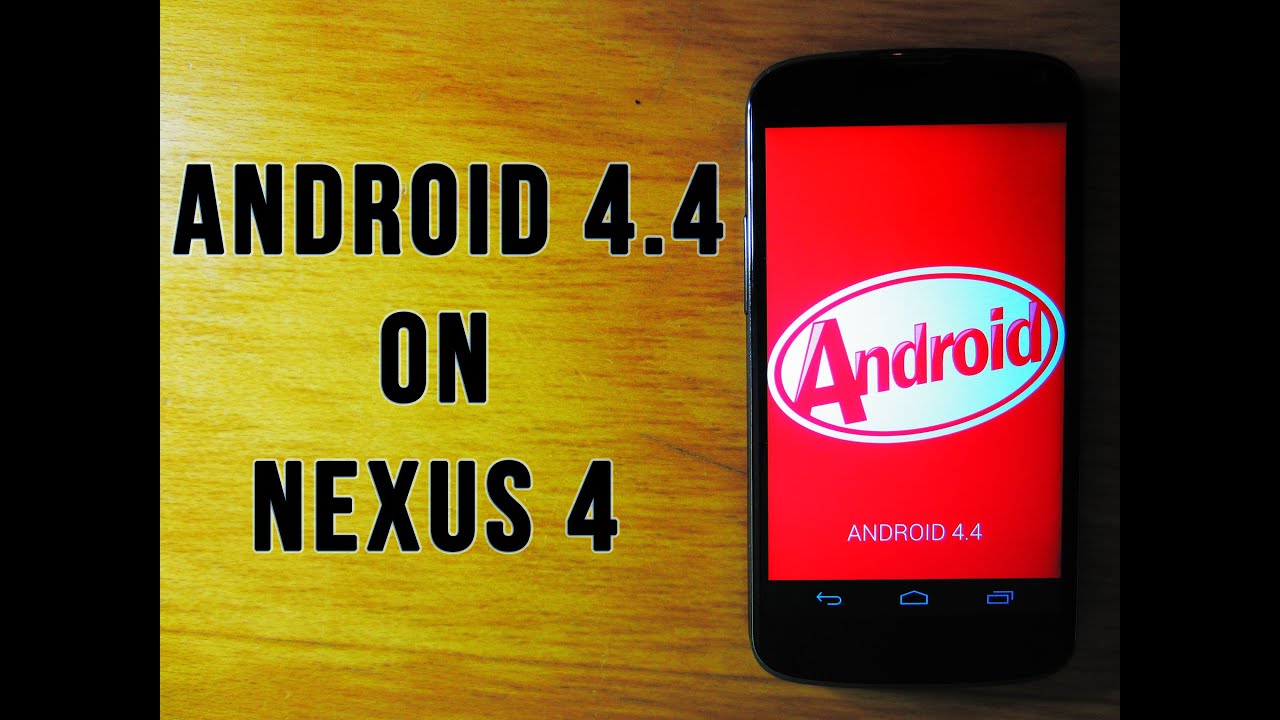
Android 4.4 Kitkat Flashing Instructions for Nexus 4, all variants of Nexus 7, & Nexus 10


We have posted on the release of factory images of android Kitkat 4.4 for all Nexus devices in the previous post. Now in this post we will brief you on the flashing instructions to get android 4.4 Kitkat onto your Nexus devices.

Pre-requisites

  1. You need to have the Android SDK installed. The SDK contains the latest version of adb and fastboot, which you will need for flashing files and issuing commands. 
  2. A MicroUSB cable to execute adb sideload, fastboot flash, and other commands. 
  3. You also have to unlock your bootloader - a process that wipes your data.
  4. Enable Developer options by going to the Settings -> About screen and tapping Build number until the OS unlocks the hidden Developer options menu. Now go to Developer options and make sure you have USB debugging turned on. For security purposes, you can turn it off after we're done.
  5. To unlock the bootloader, if you haven't already done so:
  6. Reboot into the bootloader by issuing an adb reboot bootloader command on your computer or using the correct combination of buttons applicable to your device. Warning: This will wipe your data. Type in fastboot oem unlock on your computer. Agree to the unlock by selecting Yes on your device (VolUp, then Power).
  7. You have now unlocked your bootloader (and the data partition was wiped clean). Verify by rebooting to the bootloader again and looking at Lock State.

Instructions

  1. Download the full factory image corresponding to your Nexus model (Nexus 4 is occam), which includes the full system, bootloader, recovery, kernel (boot.img), and radio (radio is not included for Wi-Fi-only variants). 
  2. Unpack the tgz (tar/gz) archive into its own directory. You can use any tool that reads gz and tar, like 7-Zip.
  3. Proceed with this step if you want to keep your data intact. If you skip this step, your data will be wiped. With your favorite text editor, edit (be careful not to run it by accident instead of editing) flash-all.bat (if you're on Windows) or flash-all.sh (Mac, Linux) and remove "-w" from the fastboot update command. For example, if the line reads fastboot -w update image-razor-jss15j.zip, it should now read fastboot update image-razor-jss15j.zip. The -w option instructs fastboot to wipe data.
  4. Reboot into the bootloader and run the appropriate flash-all script.
Now you are done....

Note: The above procedure restored the factory recovery, so if you want a custom one, you can flash one now .For better security, you can relock the bootloader by issuing fastboot oem lock while booted to the bootloader. This will, however, mean that if you ever want to do anything that requires an unlocked bootloader, you will lose your data in the unlock process.

Rooting

  1. Rooting your Nexus is very easy. It requires an unlocked bootloader and a custom recovery. I recommend using TWRP.
  2. Flash TWRP from here (Reboot into the bootloader as before and then fastboot flash recovery FILENAME.img).
  3. Reboot into recovery (adb reboot recovery).
  4. Flash SuperSU. To do that, download the zip, then put the recovery into adb sideload mode (in TWRP, it's under Advanced), and then do adb sideload FILENAME.zip.
You should be rooted.
Reboot, head to the Play Store, and update SuperSU.

Download Nexus factory images and binaries

7.25.2013

Locket App:" Get paid for your Android lock screen


A new android app Locket was released on thursday,the 18th, that lets you cash in on your lock screen. Locket is an Android app that delivers ads on your lock screen and pays you just for unlocking your phone. 1 cent every time you unlock the screen with a limit of 3 per hour that adds up to 3 cents per hour or 36 cents per day. Locket also pays $1 per referral. You can cash in when your earnings reach $10.

Get locket app here : https://play.google.com/store/apps/details?id=com.locket.android

For more on locket check : www.getlocket.com

3.07.2013

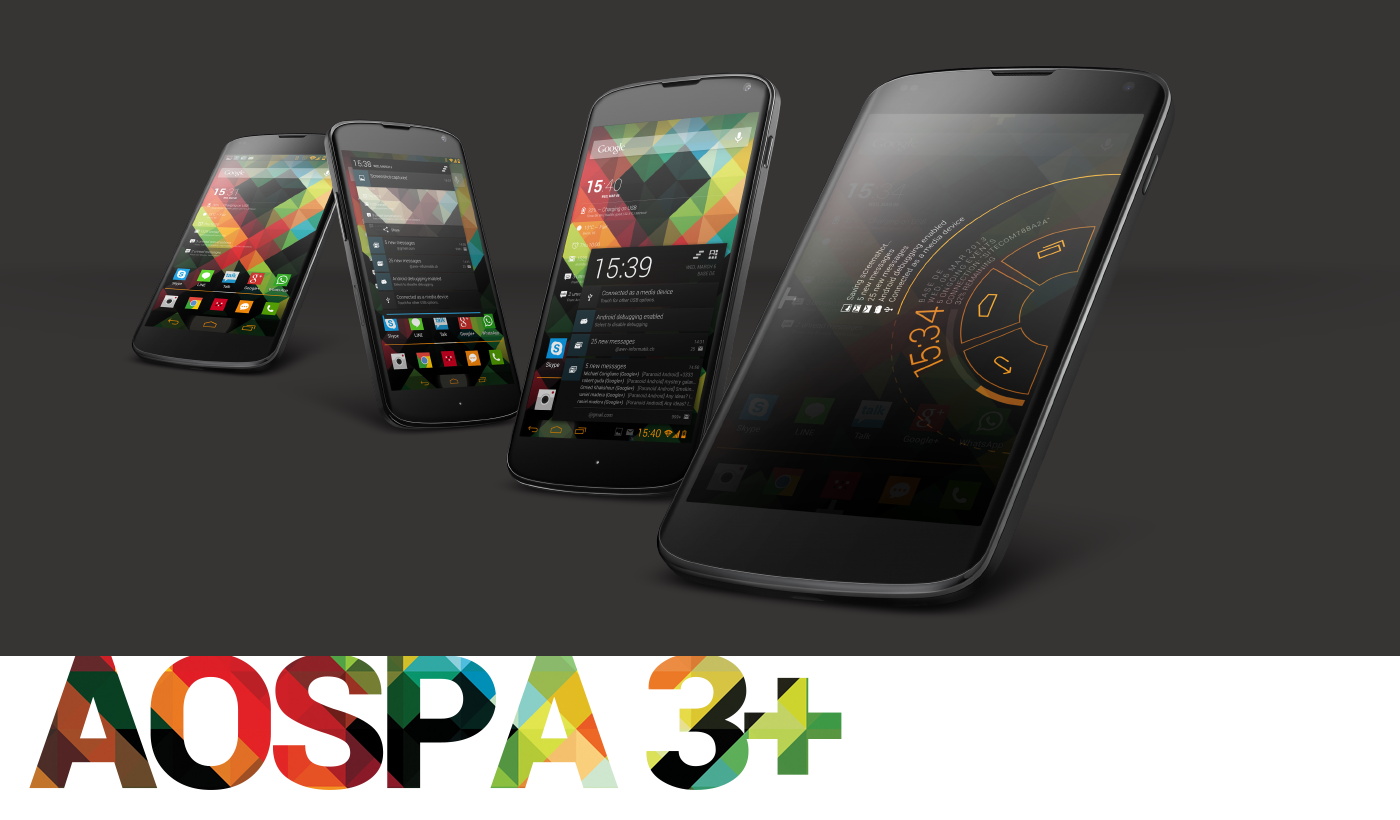
PARANOIDANDROID 3.1 ROM build Mar 7[AOSPA 4.2.2 JDQ39] for NEXUS


Instructions

1. UPDATE RECOVERY
2. FACTORY RESET
3. INSTALL ROM, GAPPS
4. WIPE CACHE & DALVIK CACHE
5. REBOOT
PARANOIDANDROID 3+ UPDATES DO NOT NEED A FACTORY RESET,
BUT YOU NEED TO INSTALL GAPPS .

BUILDS STARTING FROM MARCH 2ND USE GOOGLES NEW 4.2.2 DRIVERS.
YOU MUST BE UP TO DATE REGARDING YOUR RADIO (AND BOOTLOADER)
OR ELSE NO 4.2.2 ROM WILL WORK FOR YOU.
YOU CAN DOWNLOAD FROM GOOGLE AND FLASH VIA FASTBOOT,
OR GET IT STRAIGHT FROM below links as a CWM Flashable ZIP.This zip will update your baseband and bootloader to the ones in the JDQ39 update.

Download Baseband and Bootloader

Download Baseband only

Download Bootloader Only

Download Fix for sensors
 Only flash if your sensors are broken after you flash everything else. Most roms should be updated to 4.2.2 with proper props now so this shouldn't be needed.

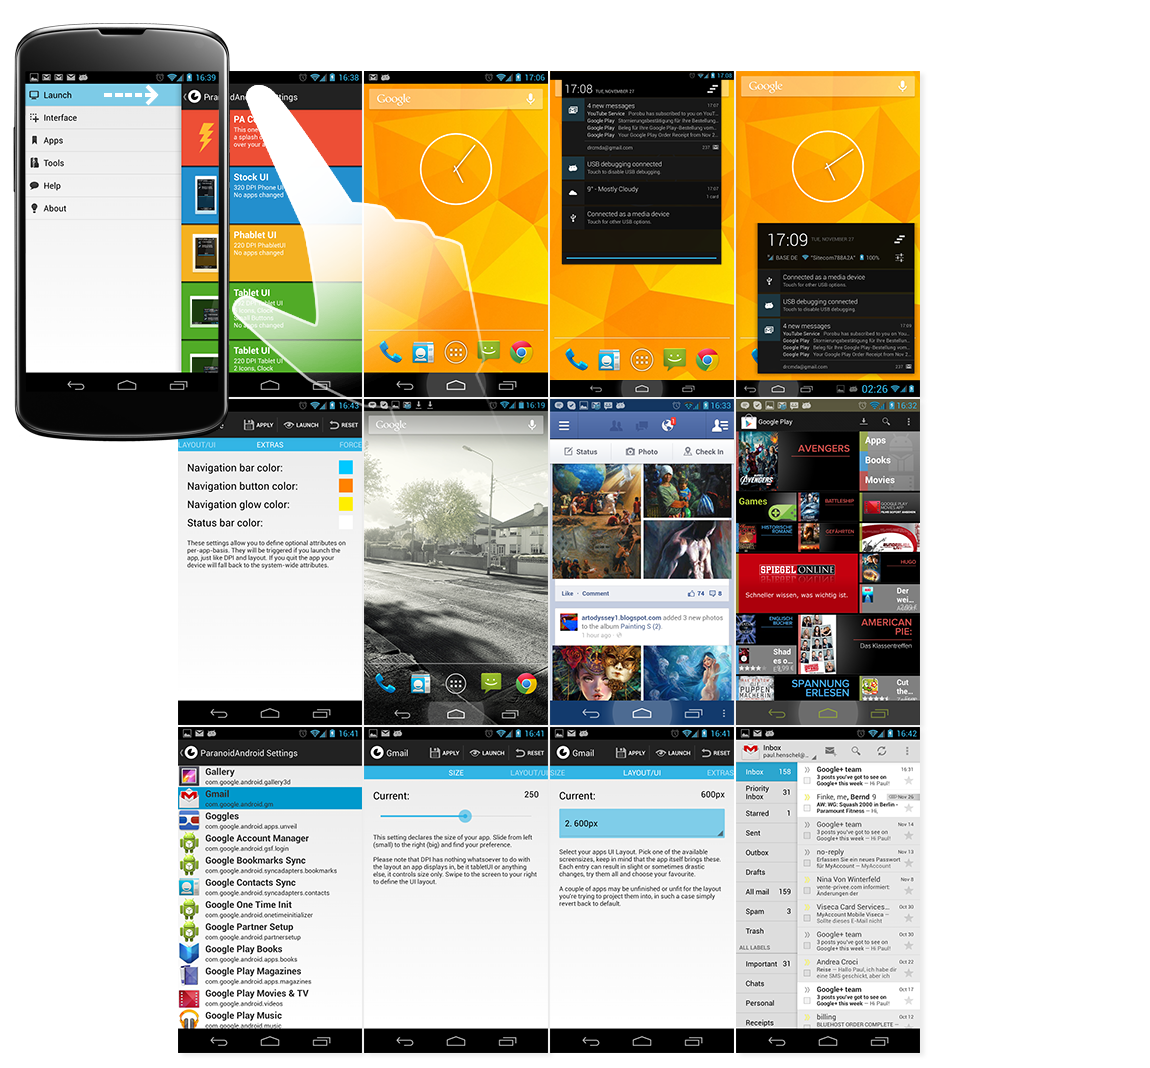
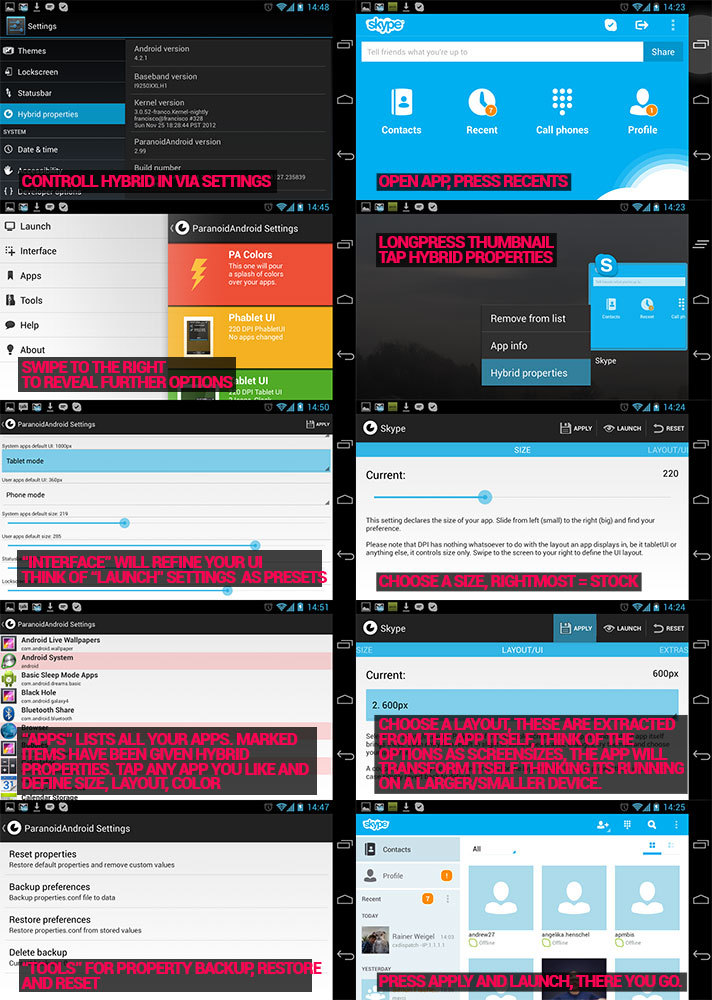
Screen shots:-


Settings Tutorial:-

CREDITS, 
AOSP/Google, Cyanogenmod, Goo, XDA, Krebsmilk, giannisgx89, Liquid, AOKP.

LINKS,


Forum links:xda Link 1 & Link 2

1.10.2013

Boot Android from SD Card on the Samsung Wave


Users now have the option to run Android and the device’s stock OS. This functionality is now available for the Samsung Wave.
XDA Senior Member hero355 wrote a tutorial on how to get Android booting from the Bada device’s SD card.
The process is not that difficult but do require that users pay attention. There are several zips that will need to be downloaded and flashed in recovery. During the process, users are given the choice as to how much they want to use for internal storage for the Android ROM they’re flashing, so that the SD card can be properly partitioned.
Once done, users have the option of booting into Bada or Android.
There are some issues such as,

WHAT DOESN’T WORK (BUGS/TODO)

all Modem (GSM/GPRS) functionallity
GPS
Microphone
Magnetometer
Optical sensor
Power and hold key handling has to be polished
Battery Gauge (NOTE: It can destroy your battery calibration due to prolonged usage! You had been warned.)

WHAT DOES (SHOULD) WORK
Sound playback
Screen
Wifi/BT
Accelerometer
Camera
SD Card
Battery now shows 50 %
Overclock now possible to 1200 MHz Max
Available Ram 285~290 MB on NAND
Fixed Moving app to SD
Fixed installable apps problem(Previously Some apps couldn't install)

Changelog 08.01.2013 :
Now no more need Bada partition
Overclock possible to 1400 MHz
Available Ram now 286-303 MB (Seperate 2 Kernel)
Compiled on Devil Kernel
Devil Tweaks included
I can say,Real android phone i'm using
Advanced Setting of Galaxy S
mDNie works
TV OUT Works (on V2)
I/O Scheduler: SIO
Bigmem and Hugemem on Performance setting
Fixed Video problem on V1


Installing on SD Card

Bada 2.0 is required
  1. For Fresh Installation,I suggest you Reflash bada.  Attention : Backup your SD Card.

    If you previously installed this rom,Need Repartition SD,So Backup again
  2.  Download 2 packages: BOOTFILES, armlinux_boot for S8500 :
    Releases link: http://goo.im/devs/Rebellos/wave
  3. Download zImage (Kernel) from upper.
  4. Start Bada.
  5. Copy zImage to the Bada's User partition (the one about 390MB big).
  6. Flash BOOTFILES and FOTA using Multiloader.If you have been already using FOTA and BOOTFILES you don't need to reflash 
  7. Switch off your phone
  8. Go to CWM using Call End + Volume Up buttons
  9. Be patient, first bootup will keep unresponsible on Black Screen for up to 3 minutes.
  10. CWM Recovery starts, pick:
    Advanced>SD Partition>select how many space you want as internal memory>SWAP-0M
    (F.e : If you have 8GB select 4096, 4GB select 2048, 2GB select 1024 and etc..)
    Attention:After SD partitioned then go next step,No need Reboot
  11. Then follow this and connect USB to PC : Mounts and Storage>Mount USB Storage
  12. Copy your Rom to SD Card and unmount USB Storage
    • install zip from sdcard
    • choose zip from sdcard
    • "blablabla.zip"
    • Yes - install
  13. Then reboot holding the Power key
Step 6

Downloads:

Tigrouzen Rom Based on Cyanogen Mod 10.1 included Gapps : http://www.multiupload.nl/DL8EVAW1RX

Kernel V1 (08.01.2013) for Android 4.2.1 : http://www.multiupload.nl/ES8HNRY4U1
Without Camera You have 296~303 MB Ram

Kernel V2 (08.01.2013) for Android 4.2.1 :http://www.multiupload.nl/TBM2A8AWNE
Camera works,Video also work(without record) and You have 280MB Ram

Source is available on Github Repo : https://github.com/Tigrouzen & https://github.com/Rebell


Source:-XDA post 1 & post 2

10.12.2012

Google Announces The Android Jelly Bean 4.1.2 Update : Nexus 7 Tablet gets it first

Google launches the update Jelly Bean 4.1.2 and is available for the Google Nexus 7 tablet and the Android Open Source Project mirrors. The update comes with the an OTA for the Nexus 7, which now benefits from a landscape-capable default launcher. Another feature present is a one-touch notification center.The update is merged into CyanogenMod 10 and is too fast for the merge which is just announced.


(Thanks to http://www.xda-developers.com)


The build number is JZO54K and the AOSP tags are android-4.1.2_r1 and jb-mr0-release. 

Google says the update improves performance and stability and fixes bugs. But its reported that it is not much useful, but definitely it is a start and many more updates are to roll out. Google request to make the update soon it arrives and the future variants of the grouper hardware will have a minor change in one of the components that will not be compatible with 4.1.1.

We give here the manual method of rooting the update.

Downloads


Steps

1. Root your Nexus 7

2. flash ClockworkMod Recovery

3. Download Android 4.1.2 Jelly Bean JZO54K

4. Place it directly under /sdcard

5. Reboot to ClockworkMod (CWM) Recovery.

6. Navigate to install zip from sdcard
    (choose zip from sdcard and then select the file you transferred in Step 4)

7. Select reboot system now from the main menu.

6.29.2012

Android 4.1 Jelly Bean For Galaxy S3

Its hardly 2 months since Samsung launched Galaxy S3.  Reports says Android 4.1 Jelly Bean port is out for Galaxy S3 already. The port is just not for normal use, since most of the features are not working. The driver is just under development and may use at your own risk.

There is no news for official firmwares are not out yet. Since unofficial roots are coming we could expect to get the official firmwares soon. 


Features like Wi-FI, bluetooth and even camera are reportedly not working on the port. May be you can just check the hardware acceleration and call/SMS features. 

Finf more information in http://www.xda-developers.com.

Source

Jelly Bean : Android Gets Better


Android, the most popular mobile platform gets even better with the latest pin up, Jelly Bean. Jelly Bean 4.1 is the fastest and smoothest version of android ever. Android have been improving through out its dream run and so in Jelly bean, reports say.


Androids most popular version IceCream Sandwich has seen some of the amazing phones ever in it, including Galaxy S2, Galaxy Note and finally the one that amazed the world , Galaxy S3. Now its time for Jelly Bean. Reports says the Jelly Bean updates for popular smart phones are ready for release. 

We will come up with updates, stay connected to our rooting section.

Key Features


  • Vsync timing across all drawing and animation done by the Android framework, including application rendering, touch events and display refresh
  • Triple buffering in the graphics pipeline
  • Enhanced accessibilit
  • Bi-directional text and other language support
  • User-installable keyboard maps
  • Smarter Keyboard
  • Automatically resizable app widgets
  • Bluetooth data transfer for Android Beam
  • Offline voice dictation
  • Improved voice search
  • Google Now


4.05.2012

Installation Guide of Android 4.0.4 (ICS) for Nokia N9. Alpha release #2 "Sleepless Nights"


Alpha Release #2 "Sleepless Nights"

Working:
- based on Android Open-Source Project (AOSP) v 4.0.4_r1.1 (IMM76D)
- multiple languages supported
- dualboot kernel (without reflashing), ability to choose OS after power on.
- N950 supported (see http://forum.nitdroid.com/index.php?topic=134.0)
- 3D drivers, OpenGL
- hwrotation (portrait mode only, accelerometer HAL doesn't work)
- touchscreen (multitouch)
- hw buttons (volume, power)
- ECI accessory (headset buttons)
- USB networking
- lcd off in sleep mode, electron beam effect (demo: http://www.youtube.com/watch?v=kFMTofYt_2g)
- alarm driver, RTC
- mounting MyDocs as "SDCard" [realized; NOT FIXED, but HACK EXISTS]
- basic video decoding (sw) and playback, youtube (choppy)
- wifi (only basic functionality: able to connect to AP. signal strength indication (RSSI) is broken. no tethering).
- basic CellMo functionality: network registration, USSD, SMS, data (GPRS/EDGE/3G), signaling. Actually, ofono/ofono-ril stack is used: all things that it able to do on the n900.
- bluetooth (scanning, can pair devices. I didn't test deeper).
- charging (note: without any notification in UI)
- sensors: accelerometer
- audio: playback (audio routing to: loudspeaker, headset or earpiece)
- lights HAL (lcd brightness)
- root access (via adb shell; su/Superuser.apk)

a lot of minor and major bugfixes since alpha_1.


Disclaimer
The same as: http://wiki.cyanogenmod.com/wiki/CyanogenMod_Wiki:General_disclaimer

Installation -- How to Install :

1. Install dual-boot kernel as described here: http://forum.nitdroid.com/index.php?topic=90.0

2. Install sillyboot v2. Details: http://forum.nitdroid.com/index.php?topic=127.0

3. Are you ready for NIT?
  • Download tarball from here: http://downloads.nitdroid.com/e-yes/n9/nitdroid_n9_ics_alpha2.tar.bz2                                      check its integrity, md5 sum for this archive is a1f1a4dfb93e3e6b03280ec0a50c7bad                     Mirrors: http://depositfiles.com/files/8nxo4oj8o
  • Copy the archive to your Nokia N9.
  • Execute "as root" commands:                                                                                                                      Code: [Select]mkdir/home/nitdroidtar xjvf /path_to_archive/nitdroid_n9_ics_alpha2.tar.bz2 -C /home/nitdroid/


4. Reboot, push "Volume Up" button when message "Press VolUp to boot alternative OS" appear . Wait a little, pray a little...

   Enjoy!

5. Usefull stuff:
   get adb from Android SDK (http://developer.android.com/sdk/index.html)

   Commands that would make your life easier:
   adb connect 192.168.2.15:5039 -- connect to your device. USB/ADB is broken, but ADB    works well over USB networking.
   adb logcat -- for reading "main" log
   adb logcat -b radio -- for reading "radio" log
   adb shell -- to enter to shell
   adb pull/push -- allow get/put file from/to the device
   adb shell rr -- "restart radio" -- restarts ofono and RIL
   adb shell bb -- show battery/charging status

6. Hot fixes:
http://forum.nitdroid.com/index.php?topic=183.msg1213#msg1213
http://forum.nitdroid.com/index.php?topic=184.0

Demo video


THANKS.
   Thanks to people contributed to the NITDroid project, especially BDogg64, DJ_Steve, Jay-C, Crevetor. Thanks to sniper_swe, he involved me to N9 story:)
   Thanks to "Nokia guys", Carsten Munk, Jukka Eklund, ofono team. Thanks to people involved in openmode stuff.

3.28.2012

Angry Birds Space released in Google Play

   The all time favorite Android game Angry Birds gets its new version. The new game from Rovio is set in Space as the Angry Birds float in zero gravity. A giant claw takes their eggs and Angry Birds ends up in space chasing them. The new version will have new birds in zero gravity with 60 interesting levels.


Screen Shots


Download Link : Link


How to root Samsung Galaxy S2 Skyrocket ICS Leaked firmware

       
      ICS update was available only to international Galaxcy SII users only. But now ICS frimware has leaked for the Galaxy S2 Skyrocket I727. The leak is named as IML74K. 


Downloads


Steps

  • Steps for rooting Galaxy S2 is same for all firmwares. So you can follow the steps we explained in our previous posts. For your ease i am  giving here 2 links to older posts
  • Link1 or Link 2
Thanks to

  • www.xda-developers.com


3.27.2012

'Temple Run- most downloaded ios game now out for android devices

    'Temple Run', one of the most downloaded games for iphone and ipad has released in Google Play Store (Android Market). The game got downloaded 40 million times from itunes and the number going to get bigger as it comes to Android.


     The game, Temple Run, will work on devices with Android 2.1 and above. The game goes like this, ' You have stolen a cursed idol from a temple. You have to run for your life to escape from evil demon monkeys'. The game gives the feeling of an 'Indiana Jones' film.


 The game can be downloaded from Google Play Store.

Download Link : https://play.google.com/store/apps/details?id=com.imangi.templerun


Thanks to

https://play.google.com/store


3.24.2012

Android 5.0, aka Jelly Bean, set for Q3 release

Android 5.0 aka Jelly Bean is set to be released in the Q3 of 2012.The codename Jelly Bean is almost certain with many manufacturers such as ASUS confirming the name. This news comes at a time when the latest  data released by Google says that so far only 1.6% of android devices have got Ice Cream Sandwich installed in them. Most of the Android device manufacturers are set to roll out their ICS updates by the end of Q2.

We still don’t know much about the next version of Android, but expect to see plenty at Google I/O at the end of June. The sole rumor so far about Jelly Bean is being centered around a docked desktop-style interface.

Source: androidcommunity

3.11.2012

Cheap Android Tablets sneak peek


The low cost educational android tablet war is getting crowded in the Indian market. It all started with Akash- India's $35 tablet last year. Then came Ubislate 7+ at a price tag of 3000 INR($60) with 3G support and other features. All this started when the Indian Government decided to start developing tablets for its students.
Here am listing out a few other cheap tablets to be launched this month or in a month.


BSNL's Penta


The latest entrant in the field is the Penta series tablets introduced by BSNL, the state owned telecom carrier.
BSNL has launched three tablets in partnership with Pantel, a Noida-based company. The three new BSNL tablets are Penta TPAD IS701R, Penta TPAD WS704C and Penta TPAD WS802C.  
Out of the 3, Penta TPAD IS701R is the costs the lowest at INR3500($68). The device packs a 17.8-cm (7-inch) resistive touchscreen,800 X 600 resolution, front-facing camera, 1GHz processor and 256 MB RAM running Android gingerbread 2.3, which is expandable up to 32 GB via memory card. 


ATab


ATab is another new device to debut in the low-cost tablet market segment. AcrossWorld Education has launched ATab tablet in India in a tie-up with Delhi-based GoTech.


The ATab Android tablet features a 17.8-cm (7-inch) TFT touchscreen, 1.1 GHz processor, 512 MB RAM with 2 GB built-in memory, expandable up to 32 GB. The device will further support Wi-Fi and an external 3G USB dongle. The company plans to provide a three-year free and unlimited access to AcrossWorld Education's proprietary and revolutionary education technology platform, EducationBridge. Atab will hit the stores in the Indian market in the second week of March at a price point of INR 5,000.  


BizzBook 


Hyderabad-based start-up firm Bizz Group is set to launch six new budget tablets priced between INR 3,200 and INR 12,000 in the second week of March to compete with Aakash tablets.  


The company revealed that BizzBook B7i1 will be in the same league as Aakash tablet, priced at INR 3,200. The new B7i1 tablet will sport a resistive 17.7-cm (7-inch) touchscreen, a 800 Mhz processing speed, Android 2.2 operating system, and a battery that can last from two to four hours. However, additional phone calling will make the device costlier by INR 4,200. The company will also be offering a device matching the specs of Aakash 2 in the coming days. 


ClassPad 


ClassPad tablet is being launched by Mind Shaper Technologies (Classteacher Learning Systems). The device comes with a touchscreen, 1.3 Ghz processing speed, built-in memory of 4 GB, expandable up to 8 GB and 7-hour battery life. 


Classteacher today provides solutions to almost 700 schools and has 80,000 digitised lessons and 50,000 digitised assessment programmes. The ClassPad tablets are priced between INR 6,000 and INR 12,000, depending on the screen size. The high-end version comes with a trolley model size for the students, which comprises 40 tablets within a single trolley to be shared amongst 12 classes in a single day.


AllGo Stamp 


AllGo Slate Tablet, designed and developed by AllGo Embedded Systems. Claims to be the first indigenously designed Android tablet in India, the Stamp tablet is a sub-10K device offered with L2 and L3 level hardware support in the Indian market. 


The Stamp tablet packs a 17.8-cm (7-inch) WVGA LCD display with 800 x 480 pixels resolution, 4 wire resistive touchscreen (but very responsive), ARM9 processor and Android v2.2 OS. Targeted at educational institutions, the device helps students watch course videos and read online eBooks. Available for bulk orders, the AllGo Stamp tablet is approximately priced at INR 8,000 in India. 

3.04.2012

How to increase Battery life of your android handset?

      The battery life of android phones and tablets are experienced to be too low compared to devices running  on other operating systems such as Symbian and windows. The reason behind this difference is not only hardware but the way the OS runs in your device. There are certain tips to increase the battery life up to a good extent.


1. Exit Unwanted apps

          If you hide applications it will be running in back ground and so taking a portion of the processor and hence the battery life. So when ever a running application is not wanted exit it or 'back' from it.

2. Use an application killer

          You can use an application killer to completely exit the applications and hence saving a lot of battery life and reduce the wastage of RAM.

3. Turn of frequent mail alerts

          Applications providing frequent mail alerts will access internet connectivity to get its information updated. This will use a lot of battery. So avoid using these applications if its not a must.

4. Turn off Wi Fi

          If Wi Fi is turned on it will frequently search for available Wi Fi spots and this will consume the charge. So turn off Wi Fi whenever its not needed.

5. Use 2G mode

          If internet access is not needed put the network mode in 2G. Using 3G or Dual mode will kill the battery charge.

6. Turn off weather updates

         Try to avoid using applications such as weather updates. Use it to a minimum if its a must.

7. Display Brightness

        Use display brightness according to the need. Use minimum brightness and get more power back up.

2.04.2012

How to root I9100XXLPB 4.0.3 Ice cream sandwich ICS on Galaxy S2


I9100XXLPB, based on Android 4.0.3
A new firmware for the Galaxy S II is online.
This firmware based on Android 4.0.3 and got some new things.
This rom is still in beta/alpha fase but this one is looking really stable

Whats new


Changes we found so far…
  • Interface: Kind of 3D effect when scrolling.
  • Battery: Lots better than early ones.
  • Faster: Feels the same as LP6
  • Touch: Same as LP6.
  • Overall: Better score in our eyes than LP6 .
  • Facelock: Same as LP6 working fine.
  • Task: Same as version LP6.


Downloads

Must do
  • Make sure that your phone is well charged
  • Back up your phone data

Steps

  • Install USB drivers
  • Unzip the main firmware file
  • Shut down Samsung Kies
  • Run Odin 1.83
  • Power off your Samsung Galaxy S2
  • Hold Volume down key + Home button key and press power on to goto download mode
  • Connect phone to USB
  • You should get the message “Added! !”
  • Tick mark Re partition, Auto reboot & F. Reset time
  • Boot loader(put in Odin)

PIT = u1_02_20110310_emmc_EXT4.pit 
PDA = I9100_CODE_I9100XXLPB_CL99600_REV02_user_low_ship.tar, 
PHONE = MODEM_I9100XXLPB_REV_02_CL1101286.tar, 
CSC = GT-I9100-MULTI-CSC-OXXLP5_RST.tar

  • Press the start button and process will begin
  • When the phone gets restarted disconnect the cable
If you have any doubt in rooting steps refer our previous rooting posts


For any further reference if required : http://forum.xda-developers.com/showthread.php?p=22141760


      1.09.2012

      Android Icecream Sandwich update for Micromax a60


      Features :

      • Rooted
      • Busybox
      • Busybox as parts
      • Bash
      • init.d support
      • Zipaligned
      • Nano Editor added
      • app 2 ext
      • dalvik cache 2 ext
      • Updated SuperUser
      • Google Maps
      • RootUninstaller
      • Root Explorer
      • Lot of Free Memory (100mb+)
      • Improved Battery Life...


      Installation steps

      It is not required to wipe anything if you need to use your settings and already installed apps.
      • Copy to sdcard
      • Reboot into recovery
      • Flash this rom
      • Reboot
      • Done


      Thanks everyone for their existing Roms and Custom Recovery without which this rom would be impossible. If i've missed any names in the installer credits please forgive me. Any suggestions, tips, comments, allegations is warmly welcomed. Everyone and anyone is allowed to copy / modify / tweak / edit this rom as per their requirements.


      Source xda developers


      1.08.2012

      How to root Amazon Kindle Fire


      Amazon came up with an update, software version 6.2.1 for its Kindle Fire. The update came up with minor additions like improved scrolling, Wifi passwords,etc.

      Am sharing with you a new method to root amazon kindle fire not only on 6.2.1 version but on all versions of Kindle Fire's OS.

      Video Tutorial


      Steps to follow


      • As a prerequisite to rooting the Fire, you'll need to have ADB up and running on your PC.
      • Download jcase's Kindle Fire root app.
      • Run the root app and click "Root."
      • On your PC, in a command prompt, type "adb root."
      • Download Superuser.
      • Unzip Superuser.
      • In the command prompt, type:

                     adb remount
                     adb push su /system/xbin/su
                     adb shell chown 0.0 /system/xbin/su
                     adb shell chmod 06755 /system/xbin/su
                     adb install com.noshufou.android.su-1.apk
                     adb reboot


      Now enjoy your rooted Kindle Fire....

      If for any reason you want to unroot your Fire, simply press the "Unroot" button in jcase's Kindle Fire root app.

      1.04.2012

      How to root Motorola Droid 2: Tutorial


      Here i have come up with a guide to root your Motorola Droid 2 smartphone.An immediate benfit of this is that you will be able to install the latest version of ICE CREAM SANDWICH  Android 4.0 firmware in Droid 2.

      Rooting the device will void your phone's warranty. To get back the warranty , you need to rsetore back to the original firmware.


      Pre Requisites

      Backup all your data preferably onto  the computer.
      Make sure that a minimum of 60% charge is left in the phone.

      Procedure to Root

      • Before you begin with the rooting, you need to ensure that you are on the firmware 2.3.20 build. If you are on any of the newer builds then you need to roll back to the older version as this rooting process only works on the firmwares on or before 2.3.20 version.
      • Now download tools like RSD Lite 4.8, Motorola Drivers & 2.3.20 Firmware to your computer.
      • After downloading all the tools, install the RSD Lite suite in your computer and once installed, install the Motorola Device drivers next.
      • Now, Download and install the ADB in your computer and install the Android SDK in your computer to get the ADB shell in your computer.
      • After this, all you need to do is to download the rageinthecage-arm5, the Motorola Drivers & the Super user package from the below mentioned links.
      • Now, you will have to unzip the rageinthecage-arm5 & the Super user package to the same folder as adb (the /platform-tools folder within the Android SDK folder) and connect your phone to the computer using the original USB Cable.
      • After connecting, open the terminal and enter the below mentioned commands,

          adb push rageagainstthecage-arm5.bin /data/local/tmp/
          adb shell
          chmod 755 /data/local/tmp/rageagainstthecage-arm5.bin
          /data/local/tmp/rageagainstthecage-arm5.bin

      • Now after entering the above commands, you now need to enter the below commands in the command line,

        exit
          adb kill-server
          adb start-server
          adb shell


      NOTE: You should see a “#”. If you see a “$”, then the exploit didn’t work, please repeat above steps.  You need to enter the commands one by one with a gap of 2 -3 seconds so as to ensure that the commands are processed.


      mount -o rw,remount -t ext3 /dev/block/mmcblk1p21 /system
          exit
          adb push su /system/xbin/
          adb shell chmod 4755 /system/xbin/su
          adb push Superuser.apk /system/app/


      Now you have succesfully rooted your Droid 2..

      Related Posts Plugin for WordPress, Blogger...